From finding a parcel to filling in all the details — here’s how to get a new listing set up and ready to publish in just a few minutes.
Time: ~5 minutes · Skill level: Beginner · Updated: April 2026
BEFORE YOU START
- Active ParcelView 3D account
- Parcel ID (APN), address, owner name, or coordinates
- Basic property details: price, acreage, location
Step 1 Go to the Properties tab
Log into your ParcelView 3D account. From the main dashboard, click the Properties tab in the top navigation bar. This opens your property library — a grid of all listings organized by county, showing the parcel thumbnail, APN, acreage, location, and quick-action links for each property.

The Properties dashboard. Each card shows the APN, acreage, status badge, and view count.
✓ Tip: Use the All States and All Statuses dropdowns at the top to filter your listings. The search bar also accepts APN or county name.
Step 2 Click “+ New Property”
In the top-right corner of the Properties page, click the yellow + New Property button. This opens the New Property panel on the left side of the screen, with the 3D terrain viewer loading on the right.
The “+ New Property” button is always visible in the top-right corner of the Properties page.
Step 3 Choose how to find your parcel
At the top of the New Property panel, you’ll see the Find Your Parcel section. Click the dropdown to choose one of four search methods:
- By Parcel ID (APN) — the most reliable option if you have the assessor parcel number.
- By Address — useful for properties with a known street address.
- By Owner Name — search using the name on county records.
- By Coordinates — enter latitude/longitude directly.
The search method dropdown — four options to locate any parcel in the database.
✓ Tip: For rural or vacant land, By Parcel ID (APN) is the most accurate method. You can find the APN on the county assessor’s website or your purchase documents.
Step 4 Enter the parcel ID, county, and state — then search
With By Parcel ID (APN) selected, enter the parcel number in the first field, then type the county name and select the state from the dropdown. Once all three fields are filled, click the yellow Search Parcels button.
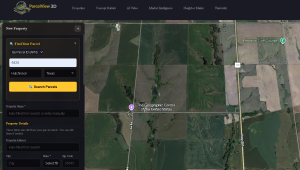
Fill in the parcel ID, county, and state — then hit Search Parcels to pull the record.
Step 5 Select the parcel and auto-fill property details
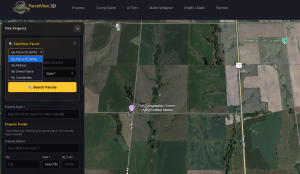
Once the search runs, PV3D displays a results list in the panel and highlights the matching parcel on the satellite map. Click the parcel marker on the map to open a popup card showing the address, owner name, APN, acreage, and county.
Review the details to confirm it’s the right parcel, then click the yellow Select This Parcel button. PV3D will immediately auto-fill all the property detail fields below — address, city, state, zip code, county, APN, latitude, longitude, and acreage — saving you from entering them manually.
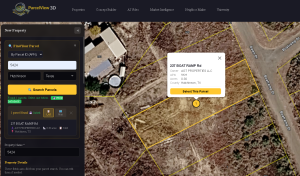
Click the parcel on the map to confirm the details, then hit “Select This Parcel” to auto-fill the property form.
✓ Tip: If the wrong parcel appears, double-check the APN format. Some counties use dashes or periods — try matching the exact format from the county assessor’s site.
Step 6 Fill in property details and pricing
Scroll down past the County Records section to reach Property Details. Most fields — address, city, state, zip code, county, APN, latitude, longitude, and acreage — are already auto-filled from the parcel search. Review them and correct anything if needed.
Below that is the Pricing section. Enter your Cash Price, Monthly Payment, Down Payment, and Loan Term (in months) for owner-financed listings. These values appear on the property card and 3D viewer.
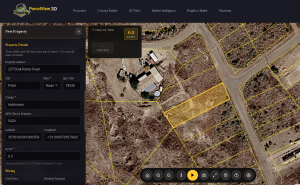
Property details will auto-fill from the parcel search. Edit if needed, then add your pricing information in the fields below.
Step 7 Add additional info, property features, and save
Continue scrolling to the Additional Info section. The elevation field is pre-filled from county data. Use the Terrain dropdown to set the landscape type for the viewer.
Under Property Features, check any features that apply to the listing. These display as badges on your listing:
- No POA RV Living Allowed · Mobile Home Living Allowed · Manufactured Home Allowed · Camping Allowed
Finally, under Viewer Layer Options, toggle which map overlays buyers can access in the 3D viewer. All four layers — Topographic Contours, FEMA Flood Zones, Wetlands (NWI), and Septic Suitability — are enabled by default.

Check applicable property features and confirm which viewer layers are enabled — then save.
✓ Tip: Property features like “Camping Allowed” and “No POA” are among the top filters buyers use. Checking them makes your listing more discoverable in the PV3D Marketplace.
When everything looks good, click Save Property at the bottom of the panel. Your new listing will appear in the Properties dashboard, ready to be viewed in 3D, shared, or published to the marketplace.
Note: You can also add a listing description after saving your property.
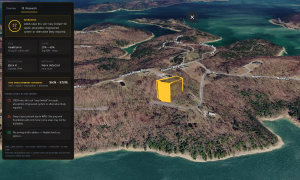
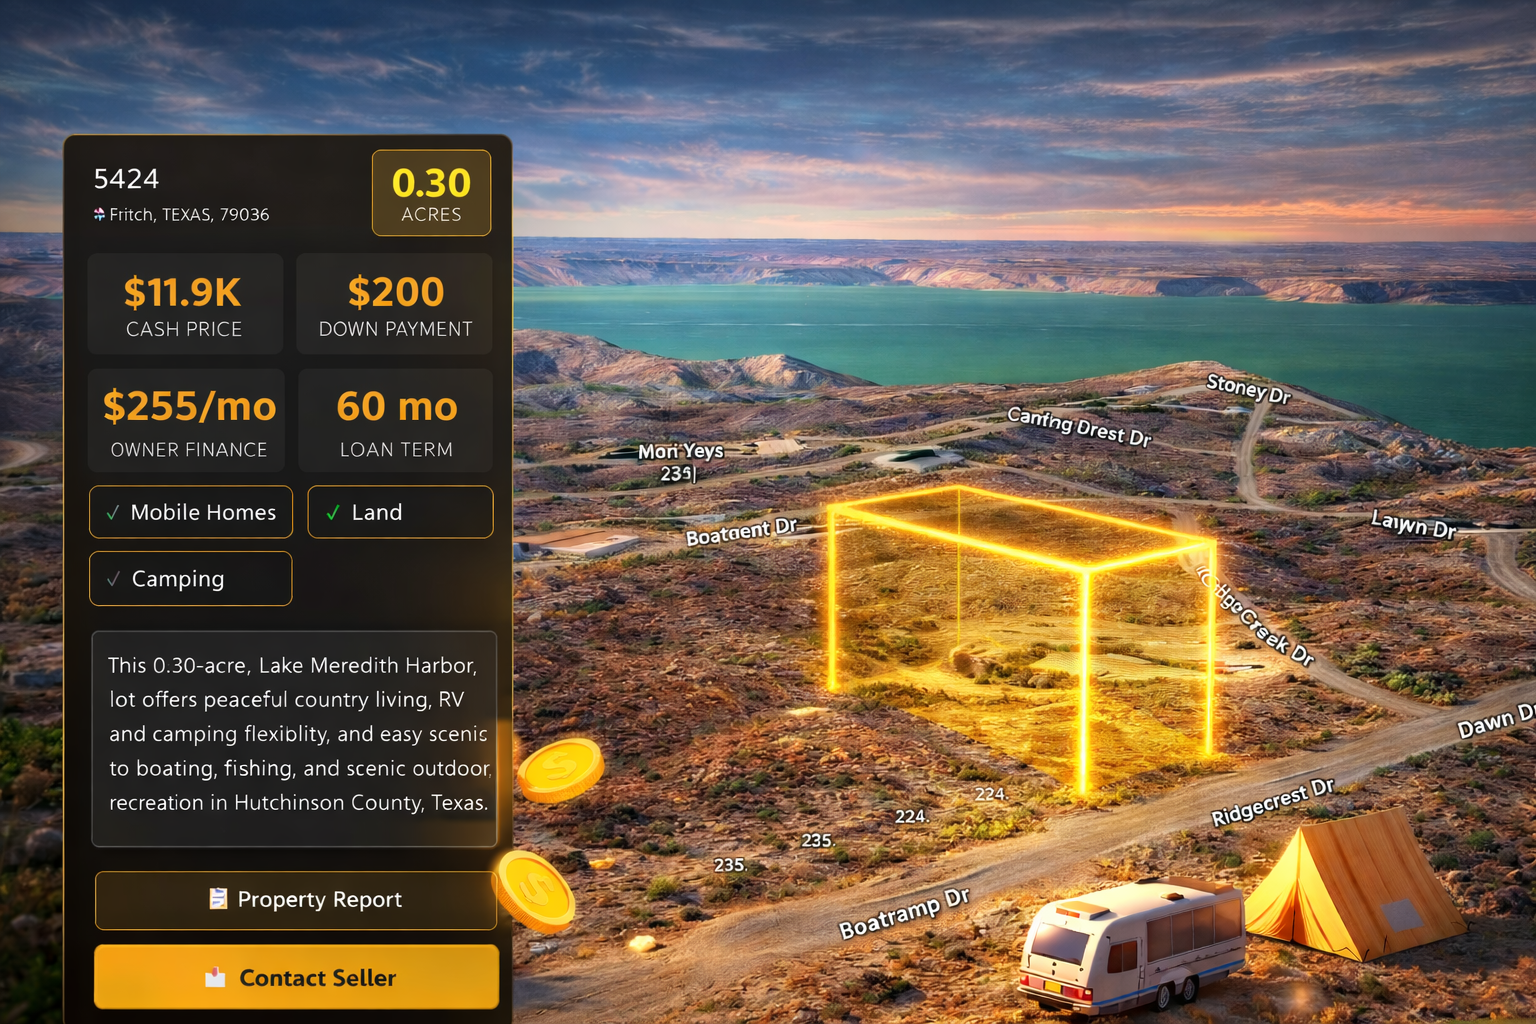
Your property is ready
Once saved, PV3D generates the 3D view automatically using parcel boundary data and terrain elevation. From the Properties dashboard you can click View 3D to preview it, Share to get the direct link, or Card to open the PropCard for this listing.